A Comprehensive Explanation of Authentication for Interfaces: The Differences between Cookies, Sessions, and Tokens.
/ 23 min read
This topic was last updated 1886 days ago, the information mentioned may be changed or developed.
Unconsciously, it has become quite long. If you can’t finish reading it at once, I suggest you bookmark it! This article mainly explains the terms related to request status (cookie, session, token) and several common implementations of login. I hope that after reading this article, you can have a clearer understanding. If you have any questions, please raise them in the comments section.
Cookie
As we all know, HTTP is a stateless protocol, and the browser and server cannot identify the context of the request based on the protocol alone.
Therefore, cookies come into play. Since the protocol itself cannot distinguish links, let’s manually carry the context information in the request header. Let’s take a look at how cookies bring dopamine to us 😏
For example, when you used to travel, you might need to store your luggage at the scenic spot. Your luggage would be piled up with big and small bags, and you wouldn’t be happy about it. After storing your luggage, the staff would give you a tag with a number indicating where your luggage is placed. When you leave, you can retrieve your luggage successfully by presenting this tag with the corresponding number.
Cookies do exactly the same thing. The traveler is like the client, and the storage place is like the server. With the tag with a number, the storage place (server) can distinguish different travelers (clients).
You might wonder, what if the tag is stolen? Will the cookie be stolen too? Indeed, it will. This is a commonly mentioned network security issue called CSRF. You can learn about the causes and countermeasures of CSRF in this article.
Initially, cookies seemed to be used to store data such as user shopping carts in e-commerce. But now, the front-end has two storages (local, session) and two databases (websql, IndexedDB), so there is no problem with information storage. Therefore, now cookies are basically used to prove the identity of the client in the connection. For example, after logging in, the server gives you a token, which is stored in the cookie. When you connect again, the cookie will be automatically sent, and the server can identify who is who. In addition, cookies can also be used to track a user, which raises privacy concerns. Therefore, there is an option to “disable cookies” (however, it is quite troublesome to disable cookies in this era).
Setting Method
Real-world examples make it clear. How can we set cookies in computers? Generally, for security reasons, cookies are set using the set-cookie header, and cookies set using the request header can be set to disallow JavaScript read and write.
However, JavaScript can still read and write cookies by itself, which is a way to persistently store cookies on the client side (although personally I don’t think it is necessary). For example, the js-cookie library allows you to easily read and write cookies using JavaScript.
Returning to the Set-Cookie attribute in the HTTP request header, here are some examples of its usage:
Set-Cookie: <cookie-name>=<cookie-value>Set-Cookie: <cookie-name>=<cookie-value>; Expires=<date>Set-Cookie: <cookie-name>=<cookie-value>; Max-Age=<non-zero-digit>Set-Cookie: <cookie-name>=<cookie-value>; Domain=<domain-value>Set-Cookie: <cookie-name>=<cookie-value>; Path=<path-value>Set-Cookie: <cookie-name>=<cookie-value>; SecureSet-Cookie: <cookie-name>=<cookie-value>; HttpOnly
Set-Cookie: <cookie-name>=<cookie-value>; SameSite=StrictSet-Cookie: <cookie-name>=<cookie-value>; SameSite=LaxSet-Cookie: <cookie-name>=<cookie-value>; SameSite=None; Secure
```markdown// Multiple attributes are also possible, for example:Set-Cookie: <cookie-name>=<cookie-value>; Domain=<domain-value>; Secure; HttpOnly
In the above example, multiple attributes are used to configure a cookie. The <cookie-name>=<cookie-value> pair can be customized, and additional configurations such as HttpOnly and SameSite can be added. Each Set-Cookie header can only configure one cookie.
- Expires sets the expiration time of the cookie (in timestamp format), based on the client’s time.
- Max-Age sets the duration of the cookie’s validity (in seconds). If both Expires and Max-Age are present, Max-Age takes precedence.
- Domain sets the domain where the cookie is valid. By default, it is the current domain and does not include subdomains.
- Path sets the path where the cookie is valid.
/matches all paths. - Secure ensures that the cookie is only sent over HTTPS to prevent man-in-the-middle attacks.
- HttpOnly prohibits JavaScript from accessing the cookie to prevent XSS attacks.
- SameSite prevents the cookie from being sent in cross-site requests to prevent CSRF attacks. (Note: There is a slight difference between cross-site and cross-origin, for more details, please refer to this article by realMorrisLiu)
It is strongly recommended to enable Secure and HttpOnly. The SameSite option needs to be discussed based on the specific situation, as it may cause issues even if the cross-origin problem is solved using CORS, due to the absence of cookies in the request. Initially, I thought it was an issue with the axios configuration, but it turned out to be irrelevant.
In fact, Chrome defaults cookies without the SameSite attribute to Lax after a certain update. Therefore, if you don’t manually set SameSite to None on the server, cross-site requests will not automatically include cookies (also note that when SameSite is set to none, Secure must be true). These security controls are all browser behaviors, which are the little things that modern browsers do to protect your network security.
Sending Cookies
According to MDN, the format for sending cookies is as follows (the PHPSESSID-related content will be mentioned below):
Cookie: <cookie-list>Cookie: name=valueCookie: name=value; name2=value2; name3=value3
Cookie: PHPSESSID=298zf09hf012fh2; csrftoken=u32t4o3tb3gg43; _gat=1
When sending cookies, the server does not need to receive the configurations such as Expires mentioned above. As long as the modern browser is functioning properly, the received cookies will be valid.
Session
From cookies, let’s talk about sessions. Sessions are the actual “information”. As mentioned above, cookies are containers that hold PHPSESSID=298zf09hf012fh2;, which is a session ID.
Does the concept of session and session ID make you a bit dizzy?
The existence of sessions is to provide information for the connection between the client and the server. Therefore, I understand sessions as information, and the session ID is the key to access that information, usually a unique hash code.
Next, let’s analyze two middleware in Node.js Express to understand two different ways of implementing sessions.
Session information can be stored on the client side, such as with cookie-session, or on the server side, such as with express-session. Using a session ID means storing the session on the server and using the ID from the cookie to retrieve the server-side information.
When we say that all session information is stored on the client side and the server does not manage the state, we can say that the backend application is “stateless”. You may not have noticed, but the popular RESTful architecture actually advocates for statelessness (https://restfulapi.net/statelessness/).
Client-side Storage
For the cookie-session library, it is relatively easy to understand. It simply encrypts all the information and stores it in a cookie. This involves the use of the cookies library. When setting a session, it is essentially calling cookies.set to write the information to the set-cookie header and then returning it to the browser. In other words, both getting and setting values are essentially manipulating cookies.
When the browser receives the set-cookie header, it writes the information to the cookie. When the next request is sent, the information is sent back as it is through the cookie. Therefore, the server does not need to store anything and only needs to retrieve and process the information from the cookie. This implementation method does not require a session ID.
Here is an example code that uses the cookie-session middleware to add a cookie to the request:
const express = require("express");var cookieSession = require("cookie-session");const app = express();app.use(  cookieSession({    name: "session",    keys: [      /* secret keys */      "key",    ],    // Cookie Options    maxAge: 24 * 60 * 60 * 1000, // 24 hours  }),);app.get("/", function (req, res) {  req.session.test = "hey";  res.json({    wow: "crazy",  });});
app.listen(3001);
Before using the app.use(cookieSession()) middleware, the request does not set any cookies. After adding it and accessing the route (and if there is no need to add session information or no content to write to the cookie after setting req.session), you can see that the server response headers have added the following two lines, which write the session and session.sig:
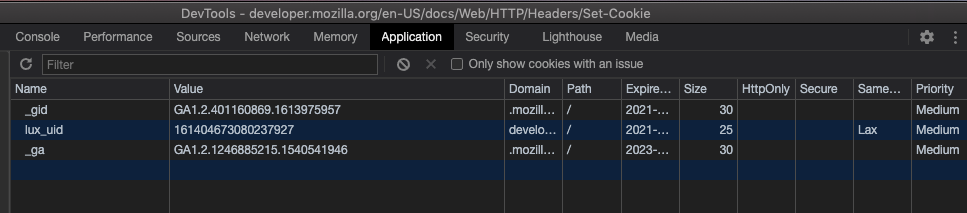
Set-Cookie: session=eyJ0ZXN0IjoiaGV5In0=; path=/; expires=Tue, 23 Feb 2021 01:07:05 GMT; httponlySet-Cookie: session.sig=QBoXofGvnXbVoA8dDmfD-GMMM6E; path=/; expires=Tue, 23 Feb 2021 01:07:05 GMT; httponlyThen you can see the successful writing of the cookie in the Application tab of DevTools. The value of the session, eyJ0ZXN0IjoiaGV5In0=, can be obtained by decoding it with base64 (if you are not familiar with base64, you can see here), which is {"test":"hey"}. This is what is called “putting session information on the client side”, because base64 encoding is not encryption, it is no different from transmitting plaintext. So please do not put confidential information such as user passwords in the client-side session.
Even though modern browsers and servers have made some agreements, such as using HTTPS, cross-origin restrictions, and the httponly and sameSite configurations mentioned above for cookies, they ensure the security of cookies. But think about it, even if transmission security is guaranteed, if someone steals the cookies from your computer and there happens to be a password stored in the cookie, they can silently steal the password. On the other hand, if only other information is stored or only a “logged in” flag is proven, as long as you log out once, the cookie becomes invalid, which reduces potential risks.
Speaking of the second value, session.sig, it is a 27-byte SHA1 signature used to verify whether the session has been tampered with, providing another layer of security for cookies. In fact, this idea is exactly the same as what will be mentioned later about JWT.
Server Storage
Since it needs to be stored on the server, express-session requires a container store, which can be memory, Redis, MongoDB, and so on. Memory should be the fastest, but it will be lost when the program is restarted. Redis can be used as an alternative. Storing sessions in a database doesn’t seem to be a common scenario.
The source code of express-session is not as concise and easy to understand as cookie-session. There is a somewhat confusing issue inside it: how is req.session inserted?
If you are not interested in the implementation, you can skip the following lines. If you are interested, you can follow the train of thought and take a look at the source code of express-session:
We can start searching from the keyword .session = and find:
store.generatecan be ruled out, as it is clearly used for initialization.Store.prototype.createSessionis the function that sets the session property in req based on the req and sess parameters. Yes, that’s it.
So, we can do a global search for createSession and locate the inflate function in the index file (which means filling).
Finally, we look for the calling point of inflate, which is the callback function of store.get that takes the sessionID as a parameter. Everything makes sense now.
After detecting the cookie sent by the client, you can obtain the sessionID from the cookie and then use the ID to retrieve the session information from the store and attach it to req.session. With this middleware, you can smoothly use the session in req.
What about assignment? It is different from storing on the client side. In the case of storing on the server, if you modify the session, it is a “real modification”. There is no need for any fancy methods. The information in memory is modified, and the next time you retrieve the corresponding information from memory, it will be the modified information. (This is only applicable to the memory implementation. When using a database, additional writing is still required.)
In the case where there is no session ID in the request, a new session is created using store.generate. When you write to the session, the cookie can remain unchanged. You just need to access the session information in memory based on the original cookie.
Translate into English:
app.use(  session({    secret: "keyboard cat",    resave: false,    saveUninitialized: true,  }),);
app.use(function (req, res, next) {  if (!req.session.views) {    req.session.views = {};  }
  // get the url pathname  var pathname = parseurl(req).pathname;
  // count the views  req.session.views[pathname] = (req.session.views[pathname] || 0) + 1;
  next();});
app.get("/foo", function (req, res, next) {  res.json({    session: req.session,  });});
app.get("/bar", function (req, res, next) {  res.send("you viewed this page " + req.session.views["/bar"] + " times");});
app.listen(3001);
Comparison of Two Storage Methods
First, let’s address the most important philosophical question in the computer world: the trade-off between time and space.
When storing session data on the client-side, it frees up the server’s memory used for storing sessions. However, it requires sending a large amount of base64-encoded session information with each request, which can slow down the transmission if the volume is high.
On the other hand, storing session data on the server-side saves bandwidth by utilizing the server’s memory.
Additionally, there are differences in the implementation and outcome of logging out.
In the case of server-side storage, it is simple: if req.session.isLogin = true represents logging in, then req.session.isLogin = false represents logging out.
However, achieving a true “immediate logout” with client-side storage is challenging. You can add an expiration date to the session information or rely on the expiration date of the cookie. Once expired, it can be considered as logging out.
But what if you don’t want to wait for the session to expire and want to log out immediately? If you think about it, you will realize that it is really difficult to achieve with only the session information stored on the client-side.
Even if you delete the client-side cookie by req.session = null, it only removes it. However, if someone has copied the cookie before, the cookie in their possession will remain valid until the expiration time specified in the session information.
The phrase “immediate logout” may sound sensationalist, but what I want to express is that you cannot immediately invalidate a session, which may lead to some risks.
Token
Now that we have covered sessions, let’s talk about the frequently mentioned keyword: token.
If you Google the word “token,” you will see a few familiar images (for those who are older): password generators. In the past, online banking required not only SMS authentication but also a password generator. It displayed a changing password, and you needed to enter the code from the password generator to make a transfer. This is an example of a token in the real world. It is a proof of identity with a string of codes or a digital certificate, just like the luggage example mentioned earlier…
In essence, the functionality of a token is exactly the same as a session ID. It is perfectly fine to refer to a session ID as a session token (Wikipedia even mentions this alias).
The difference lies in the fact that a session ID is typically stored in a cookie and automatically sent with each request, while a token is typically manually included in the request, such as setting the Authorization header to bearer:<access_token>.
However, the above statements are generalizations, and there are no strict rules!
Now, let me give you a sneak peek of what we will discuss next: JWT (JSON Web Token)! It is a token! But it contains session information! It is stored on the client-side and can be placed in either a cookie or manually added to the Authorization header! But it is called a token!
So, personally, I think you can’t determine whether it’s a token or a session ID based on the storage location, nor can you determine whether it’s a token or session information based on the content. Session, session ID, and token are all abstract concepts. As long as you understand what they are and how to use them, the terminology is not that important.
In addition, when searching for information, I also came across some articles that said the difference between session and token is the difference between old and new technologies, which seems to make sense.
On the Wikipedia page for session, in the HTTP session token section, examples are given for traditional technologies such as JSESSIONID (JSP), PHPSESSID (PHP), CGISESSID (CGI), ASPSESSIONID (ASP), etc. It’s like SESSIONID is synonymous with them. However, when researching API interfaces and OAuth 2.0 login for various platforms nowadays, the term “access token” is used, which is quite interesting.
After understanding the connection between session and token, where can you see a “live” token?
Open GitHub and go to Settings / Developer settings. You can see the option for Personal access tokens. After generating a new token, you can use it with the GitHub API to prove “you are you”.
The term Access token is also used in the OAuth system. Friends who have implemented WeChat login should be able to understand what a token is.
Token is really important for authentication. It must not be leaked. Whoever has the token is the “owner”. Therefore, it is necessary to have a token system and refresh or delete the token to quickly address the issue of token leakage.
After understanding the three keywords and two storage methods, let’s formally discuss the knowledge related to “user login” and the two login standards - JWT and OAuth 2.0.
Next, you may frequently come across the terms Authentication and Authorization. They both start with “Auth”, but they don’t mean the same thing. Simply put, the former is about “verification” and the latter is about “authorization”. When developing a login system, you need to first verify the user’s identity, set the login status, and then authorize the user by sending a token.
JWT
The full name is JSON Web Token (RFC 7519). Yes, JWT is a token. To facilitate understanding, let me tell you in advance that JWT uses the client-side storage method mentioned above, so you may frequently encounter the mentioned names in this part.
Structure
Although JWT is a type of client-side storage for session information, it has its own structure: Header.Payload.Signature (divided into three parts, separated by .).
Header
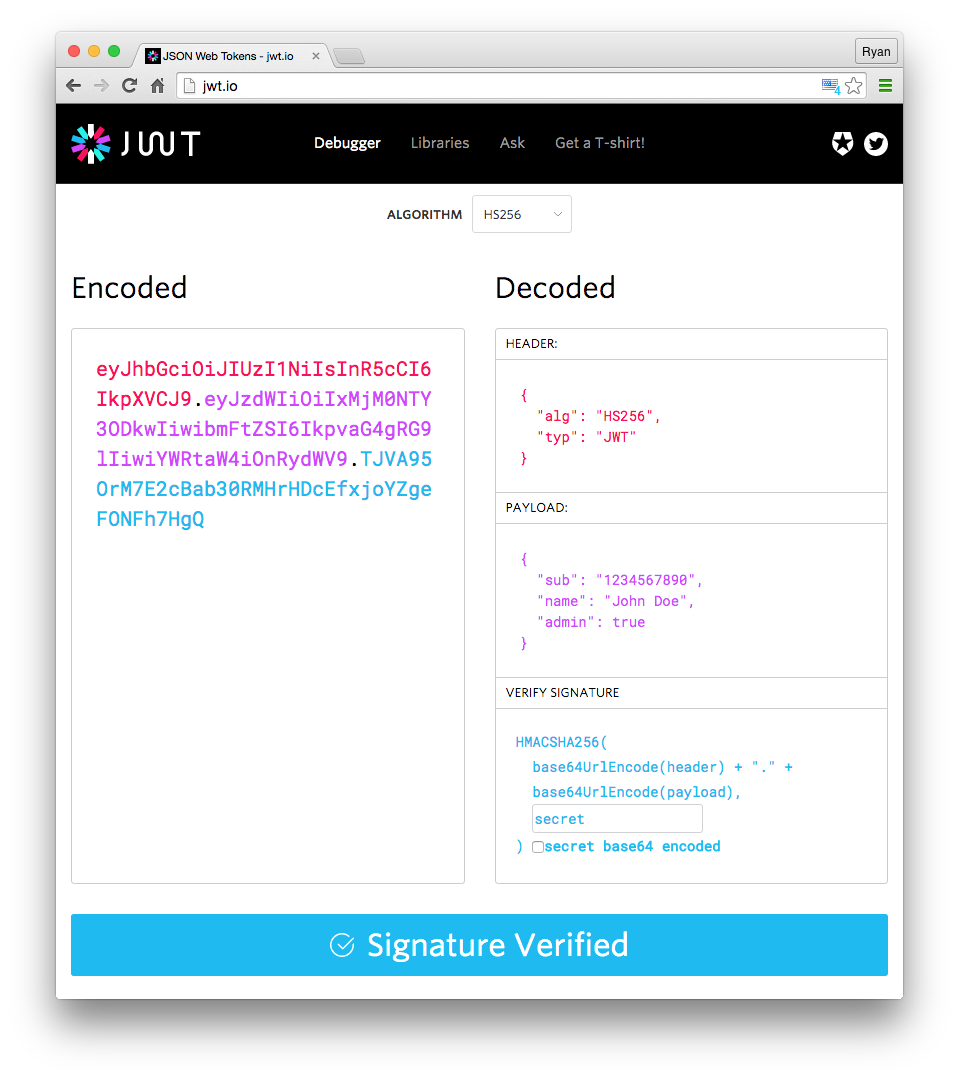
{ "alg": "HS256", "typ": "JWT"}The typ field indicates that the token type is JWT, and the alg field represents the signature algorithm, such as HMAC, SHA256, RSA, etc. Then, it is base64 encoded.
Payload
{ "sub": "1234567890", "name": "John Doe", "admin": true}The Payload is where the session information is stored. Finally, these information are also base64 encoded, resulting in something similar to the client-side stored session information.
However, JWT has some predefined properties, known as Registered claims, including:
- iss (issuer): The entity that issues the token.
- exp (expiration time): The time at which the token expires.
- sub (subject): The subject or entity that the token refers to.
- aud (audience): The intended audience for the token.
- nbf (Not Before): The time before which the token is not valid.
- iat (Issued At): The time at which the token was issued.
- jti (JWT ID): The unique identifier for the token.
Signature
The last part is the signature, which, like the session.sig mentioned above, is used to prevent tampering. However, JWT combines the signature with the content.
The algorithm for generating the JWT signature is as follows:
HMACSHA256( base64UrlEncode(header) + "." + base64UrlEncode(payload), secret)Encode base64UrlEncode(header) + "." + base64UrlEncode(payload) using the algorithm specified in the alg field of the header and the secret key you set.
Finally, combine the three parts with a .. You can see the composition of the JWT in a visual way using the jwt.io Debugger:
How to Use
After successfully verifying the user and logging in, the user will be returned a JWT. Since the information in the JWT is not encrypted, do not put passwords in it. The detailed reasons are mentioned in the cookie stored on the client side.
When a user accesses a protected link, the token can be placed in a cookie or included in the request header as Authorization: Bearer <token>. (Manually placing it in the request header is not subject to CORS restrictions and is not vulnerable to CSRF attacks.)
One drawback of JWT is that it cannot be invalidated because the information is stored on the client side.
P.S. Although it is common to use JWT for single sign-on (SSO), I still don’t quite understand the special connection between the two.
HTTP Authentication
HTTP Authentication is a standardized authentication method that does not use cookie and session-related technologies. The request header contains an authorization field in the format Authorization: Basic <credentials>.
The credentials are the Base64-encoded username + : + password (or token). When you see Basic authentication, just remember to include the username and password with every request.
Basic authentication is more suitable for serverless applications, as they do not have running memory to store sessions. Just include the authentication with every request.
OAuth 2.0
OAuth 2.0 (RFC 6749) is also a token-based authorization protocol. Its feature is that you can use other services within a limited scope, and you can also use other login systems to log in to your own application, which is called third-party application login. (Pay attention, the OAuth 2.0 authorization flow might be asked in an interview!)
Since it involves third-party login, there must be a third-party login server in addition to the application itself. OAuth 2.0 involves three roles: the user, the application provider, and the login platform. The calling relationship between them is as follows:
+--------+ +---------------+ | |--(A)- Authorization Request ->| Resource | | | | Owner | | |<-(B)-- Authorization Grant ---| | | | +---------------+ | | | | +---------------+ | |--(C)-- Authorization Grant -->| Authorization | | Client | | Server | | |<-(D)----- Access Token -------| | | | +---------------+ | | | | +---------------+ | |--(E)----- Access Token ------>| Resource | | | | Server | | |<-(F)--- Protected Resource ---| | +--------+ +---------------+Many large companies provide OAuth 2.0 third-party login. Let’s take WeChat as an example here.
Preparation
Generally, the application provider needs to apply for an AppID and AppSecret from the login platform. (WeChat uses this name, other platforms are similar, one ID and one Secret)
Get code
What is the authorization temporary ticket (code)? Answer: When a third party obtains an
access_tokenusing the code, it needs to be used. The code has a timeout of 10 minutes, and a code can only be exchanged for anaccess_tokenonce, after which it becomes invalid. The temporary nature of the code ensures the security of WeChat authorization login. Third parties can further enhance the security of their own authorization login by using HTTPS and state parameters.
In this step, the user first undergoes identity verification on the login platform.
https://open.weixin.qq.com/connect/qrconnect?appid=APPID&redirect_uri=REDIRECT_URI&response_type=code&scope=SCOPE&state=STATE#wechat_redirect| Parameter | Required | Description |
|---|---|---|
| appid | Yes | Unique identifier for the application |
| redirect_uri | Yes | Please use urlEncode to process the link |
| response_type | Yes | Fill in “code” |
| scope | Yes | Application authorization scope, multiple scopes are separated by commas (,), currently only fill in snsapi_login for web applications |
| state | No | Used to maintain the state of the request and callback, and is returned to the third party after the authorization request. This parameter can be used to prevent CSRF attacks (Cross-Site Request Forgery) |
Note that scope is a feature of OAuth2.0 permission control, which defines what interfaces the token obtained by this code can be used for.
After correctly configuring the parameters, opening this page will display the authorization page. After the user successfully authorizes, the login platform will redirect to the redirect_uri specified by the application provider with the code:
redirect_uri?code=CODE&state=STATEWhen the authorization fails, it will redirect to
redirect_uri?state=STATEwhich means there is no code when it fails.
Obtaining the token
After redirecting to the redirect URI, the backend of the application provider needs to use the code provided by WeChat to obtain the token. At the same time, you can also use the returned state for source verification.
To obtain the token, access this interface with the correct parameters:
https://api.weixin.qq.com/sns/oauth2/access_token?appid=APPID&secret=SECRET&code=CODE&grant_type=authorization_code| Parameter | Required | Description |
|---|---|---|
| appid | Yes | Unique identifier for the application, obtained after the application is approved on WeChat Open Platform |
| secret | Yes | Application secret AppSecret, obtained after the application is approved on WeChat Open Platform |
| code | Yes | Fill in the code parameter obtained in the first step |
| grant_type | Yes | Fill in “authorization_code”, which is one of the authorization modes. WeChat currently only supports this mode |
Correct response:
{ "access_token": "ACCESS_TOKEN", "expires_in": 7200, "refresh_token": "REFRESH_TOKEN", "openid": "OPENID", "scope": "SCOPE", "unionid": "o6_bmasdasdsad6_2sgVt7hMZOPfL"}Once you obtain the token, you can use it to call the API based on the scope you applied for when requesting the code.
Using the Token to Call WeChat API
| Scope | API | Description |
|---|---|---|
| snsapi_base | /sns/oauth2/access_token | Exchange access_token, refresh_token, and authorized scope using the code |
| snsapi_base | /sns/oauth2/refresh_token | Refresh or extend the access_token |
| snsapi_base | /sns/auth | Check the validity of the access_token |
| snsapi_userinfo | /sns/userinfo | Obtain user’s personal information |
For example, to obtain personal information, you can use the following GET request: https://api.weixin.qq.com/sns/userinfo?access_token=ACCESS_TOKEN&openid=OPENID&lang=zh_CN
Please note that in WeChat OAuth 2.0, the access_token is transmitted as a query parameter, not using the Authorization header mentioned above.
As an example of using Authorization, like GitHub’s authorization, the previous steps are similar. After obtaining the token, you can make the API request as follows:
curl -H "Authorization: token OAUTH-TOKEN" https://api.github.comReturning to WeChat’s userinfo API, the data format of the response is as follows:
{ "openid": "OPENID", "nickname": "NICKNAME", "sex": 1, "province":"PROVINCE", "city":"CITY", "country":"COUNTRY", "headimgurl":"https://thirdwx.qlogo.cn/mmopen/g3MonUZtNHkdmzicIlibx6iaFqAc56vxLSUfpb6n5WKSYVY0ChQKkiaJSgQ1dZuTOgvLLrhJbERQQ4eMsv84eavHiaiceqxibJxCfHe/46", "privilege":[ "PRIVILEGE1" "PRIVILEGE2" ], "unionid": "o6_bmasdasdsad6_2sgVt7hMZOPfL"}Subsequent Use
After obtaining the user’s personal information using the token, you can use the returned openid from the userinfo API, combined with session technology, to implement login on your own server.
// Loginreq.session.id = openid;if (req.session.id) { // Logged in} else { // Not logged in}// Logoutreq.session.id = null;// Clear sessionLet’s summarize the process and key points of OAuth2.0:
- Apply for ID and Secret for your application
- Prepare the redirect interface
- Correctly pass parameters to obtain the code <- Important
- Pass the code to your redirect interface
- Use the code to obtain the token in the redirect interface <- Important
- Use the token to access the WeChat API
OAuth2.0 focuses on third-party login and authorization. Moreover, OAuth2.0 is not the only authorization method used by WeChat. You can refer to Ruan Lao Shi’s Four Grant Types of OAuth 2.0 for other methods.
Other Methods
Both JWT and OAuth2.0 are comprehensive authentication methods, but it doesn’t mean that a login system must be so complex.
A simple login system can be built based on the two session storage methods mentioned above.
-
Based on server-side session storage, you can use methods like
req.session.isLogin = trueto indicate the login status of the session. -
Based on client-side session storage, setting the expiration date and the logged-in user is sufficient.
{ "exp": 1614088104313, "usr": "admin"}(It’s basically the same as JWT, but without a complete system)
- You can even use the knowledge mentioned above to build your own login system using Express:
- Initialize a store, which can be in-memory, Redis, or a database.
- After successful user authentication, generate a random hash code as the token.
- Write the token to the client using set-cookie.
- Write the login status to the server, for example, adding the hash code as a property in the store (using in-memory as an example).
- For subsequent requests with the cookie, check if the token brought by the cookie has been written to the store.
let store = {};
// After successful loginstore[HASH] = true;cookie.set("token", HASH);
// For requests that require authenticationconst hash = cookie.get("token");if (store[hash]) {  // Logged in} else {  // Not logged in}
// Logoutconst hash = cookie.get("token");delete store[hash];
Summary
The key points of this article are as follows:
- Cookies are containers for storing sessions/session IDs/tokens.
- Cookies are usually set using the
set-cookieheader in the request. - Session information can be stored in the browser or on the server.
- When sessions are stored on the server, the session ID is used as the key to retrieve information.
- The boundaries between tokens/sessions/session IDs are blurred.
- Generally, tokens are used for new technologies, while session IDs are used for traditional technologies.
- Cookies/tokens/sessions/session IDs are all practical technologies used for authentication.
- JWT is a type of session storage in the browser.
- The token in OAuth2.0 is not issued by the application itself but by an authorization server.
- OAuth2.0 is commonly used for third-party application login.