
1. Initial understanding of stream
The stream flows endlessly, much like the continuous data transmission in computer science.
Why is streaming important in computer science? There are two main reasons:
- To prevent memory overload
- To enable quick responses
The image above is from 2016 - the year of web streams
Let’s consider a familiar example: the streaming output of GPT. The output of LLM takes time, and since LLM outputs in a streaming manner, it sends the data to you as it generates it, allowing you to see the results faster.
For front-end developers, before the stream API was available in browsers, we couldn’t handle Ajax requests in a streaming manner (unless using EventSource as a workaround). This meant that for large data requests, we had to wait for all the data to return before processing it with a callback function, significantly reducing the user experience.
Fortunately, around 2016, the browser stream API was finally updated. In addition to the streaming return of fetch, browsers now have many other stream-related interfaces, such as:
2. Basic Structure of Streams
Let’s discuss the two most fundamental types of streams: readable streams and writable streams. We can create instances of these using ReadableStream and WritableStream. Other stream-related interfaces are based on these, so understanding these two will make it easier to grasp other interfaces.
2.1 Readable Stream
Key Concepts:
- Underlying Source: The actual source of data
- Queueing Strategy (explained later)
- Controller: The controller of the readable stream, with a focus on
enqueue - Reader: The tool for reading the readable stream
const readableStream = new ReadableStream(  {    start(controller) {      // Executed immediately upon instantiation      // Mainly for some preparatory work      // If you want to enqueue data here, you must consider desiredSize    },
    pull(controller) {      // Simply put, when there is space in the queue, downstream will pull data from upstream      // Queueing strategy will be explained here      controller.enqueue("chunk");    },
    cancel(reason) {      // Cancel callback    },  },  new CountQueuingStrategy({ highWaterMark: 5 }), // Optional);
The underlying source will receive a controller parameter, which is a ReadableStreamDefaultController.
ReadableStreamDefaultController.desiredSize(to be discussed later in the queue strategy)ReadableStreamDefaultController.close()ReadableStreamDefaultController.enqueue()ReadableStreamDefaultController.error()
We can use controller.enqueue to provide data. Once enqueue is called, the data enters the queue for the reader to consume.
Streams have no boundaries, but such an infinite concept obviously cannot exist in human-implemented systems. For the browser’s stream API, stream transmission is divided into chunks. The enqueue method mentioned above takes a chunk as its parameter. The type of chunk is generally a string or Uint8Array, but ordinary readable streams do not restrict the type of chunk, so objects can also be passed. (This does not discuss readable byte streams)
Next, we have the reader. By using stream.getReader(), you can obtain the default reader for the corresponding stream. The ReadableStreamDefaultReader comes with the following properties and methods:
ReadableStreamDefaultReader.closedReadableStreamDefaultReader.cancel()ReadableStreamDefaultReader.read()ReadableStreamDefaultReader.releaseLock()
const reader = readableStream.getReader();
reader.read().then(  ({ value, done }) => {    if (done) {      console.log("The stream was already closed!");    } else {      console.log(value);    }  },  (e) => console.error("The stream became errored and cannot be read from!", e),);
Once a readable stream is linked to a reader, it becomes locked. To allow two readers to read the same stream, you can use the tee() method to split the stream.

2.2 Writable Stream
The fundamental concepts of writable streams are quite similar to those of readable streams:
- Underlying sink: The actual point where data is processed and ultimately directed
- Controller: Primarily used for handling closing and errors
- Writer: The component responsible for writing to the writable stream
const writableStream = new WritableStream(  {    start(controller) {      // Executes immediately upon instantiation      // Mainly for some preparatory work    },
    write(chunk, controller) {      // Final processing of the written chunk    },
    close(controller) {      // Callback for closing    },
    abort(reason) {      // Callback for errors    },  },  new CountQueuingStrategy({ highWaterMark: 5 }),);
Similar to the underlying source, the underlying sink receives a controller parameter, which is a WritableStreamDefaultController. This controller has fewer operations compared to the readable stream controller and is primarily concerned with terminating the stream.
WritableStreamDefaultController.signalterminates the writer’s signalWritableStreamDefaultController.error()triggers an error and terminates the stream
Next, we have the writer. By using stream.getWriter(), you can obtain the default writer for the corresponding stream. The WritableStreamDefaultWriter has the following properties and methods:
WritableStreamDefaultWriter.closedWritableStreamDefaultWriter.desiredSize(to be discussed later in the queue strategy)WritableStreamDefaultWriter.ready(same as above)WritableStreamDefaultWriter.abort()WritableStreamDefaultWriter.close()WritableStreamDefaultWriter.releaseLock()WritableStreamDefaultWriter.write()writes data through the writer
// https://streams.spec.whatwg.org/#example-manual-write-dont-awaitasync function writeSuppliedBytesForever(writableStream, getBytes) {  const writer = writableStream.getWriter();
  while (true) {    await writer.ready;
    const bytes = getBytes();    writer.write(bytes).catch(() => {});  }}
3. Transform Streams and Pipeline Operations
Besides readable and writable streams, there is another type of stream used for data processing, commonly known as transform streams.
We can use TransformStream to create a transform stream, but in reality, any stream that implements both the read and write ends can be considered a transform stream.
const transformStream = new TransformStream(  // This section is called transformer  {    start(controller) {      /* … */    },
    transform(chunk, controller) {      /* … */    },
    flush(controller) {      /* Final cleanup after all tasks are done */    },  },  writableStrategy,  readableStrategy,);
The transform stream acts as an intermediary, combining the chunk of a writable stream and the controller.enqueue of a readable stream.
When working with transform streams, “pipe operations” are commonly used. These operations can link readable, writable, and transform streams together.
pipeTo()connects a readable stream to a writable stream.pipeThrough()connects a readable stream to a transform stream.
For instance, to implement underlying source -> transform -> transform -> underlying sink, you can write it like this:
readableStream.pipeThrough(transformStream1).pipeThrough(transformStream2).pipeTo(writableStream);4. Queue Strategies
4.1 Explanation
The queue strategy refers to the second parameter that needs to be provided when creating readable and writable streams, as previously mentioned. This strategy specifies the size of the stream’s queue using highWaterMark, which serves as a buffer between streams. It’s important to note that this size is not an absolute limit, but rather a guideline.
Why is a queue strategy necessary? Because the data processing speeds of readable and writable streams are not consistent. When there are fluctuations in speed, having a queue as a buffer can enhance processing efficiency.
Broadly speaking, there are two types: one based on count and the other based on size:
new CountQueuingStrategy({ highWaterMark: 1 })new ByteLengthQueuingStrategy({ highWaterMark: 1024 })- Without using a class, you can directly write an object
If you write the object directly, it looks something like this:
// ...{ highWaterMark: 1024, size(chunk) { return chunk.length },},// ...When the queue reaches its capacity, it should signal the upper layer to slow down to prevent memory overflow.
Think of it like pouring water into a basin; once the basin is full, you can’t add more water. This scenario is known as backpressure, and backpressure is indicated by desiredSize.
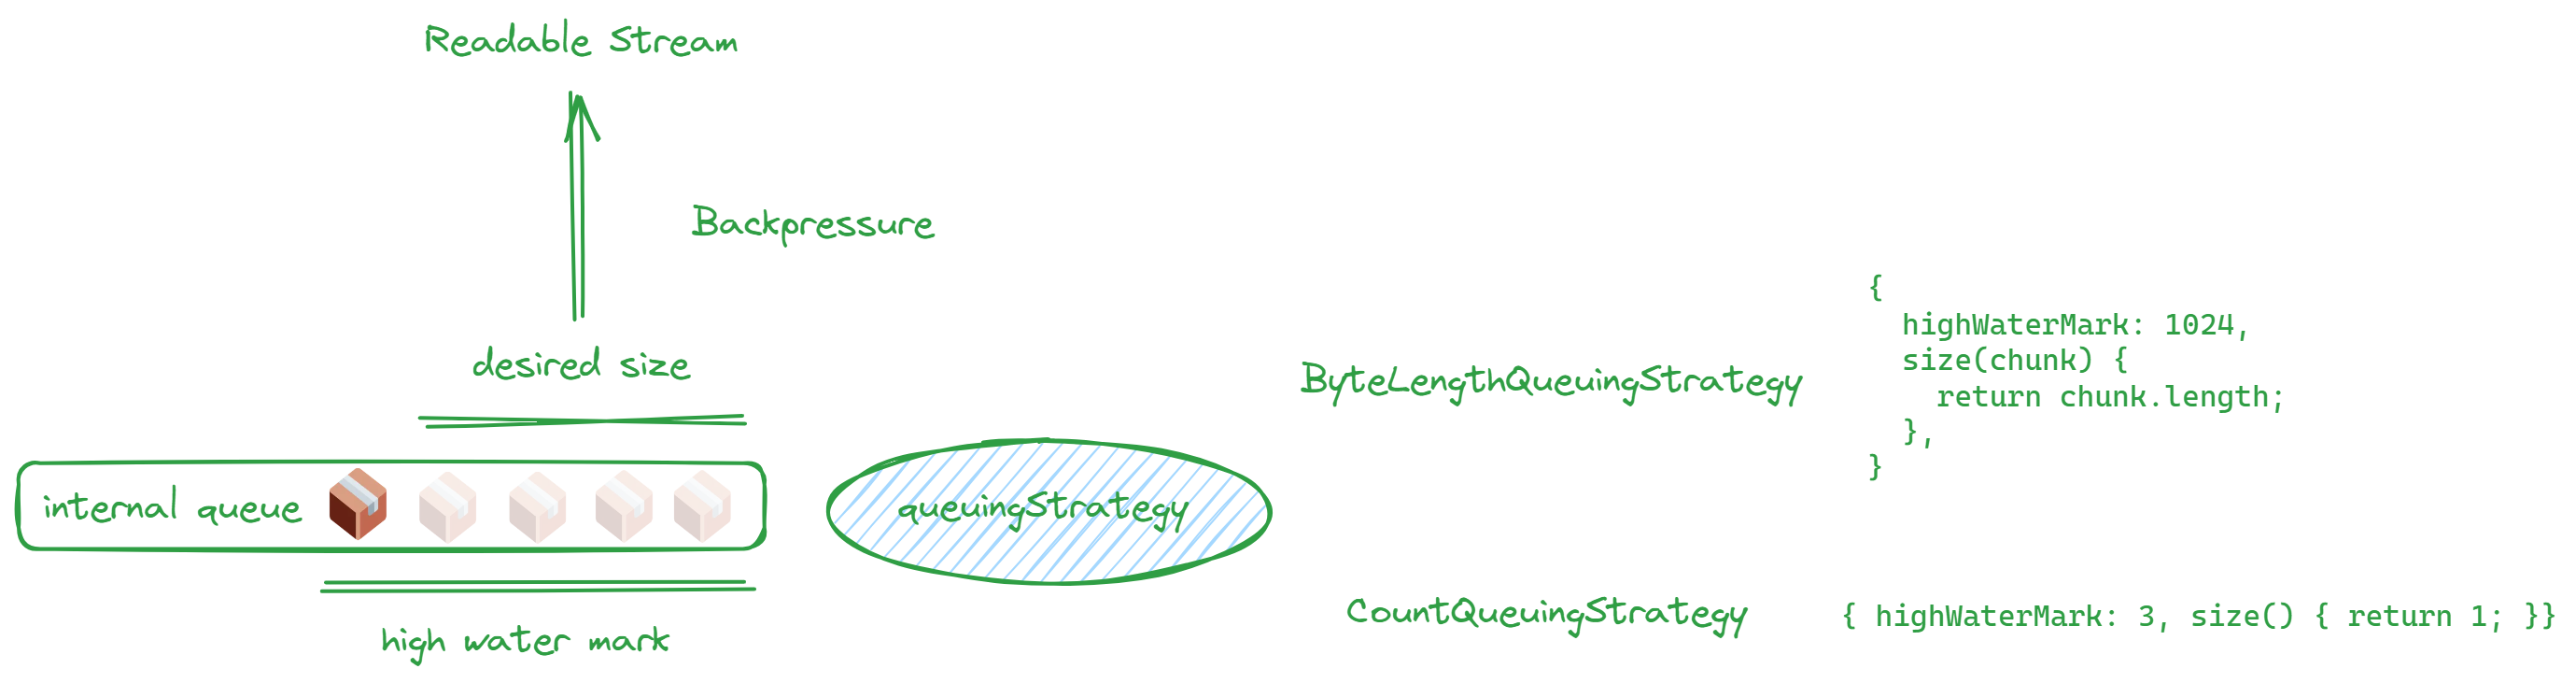
The desiredSize is calculated as high water mark - the amount in the internal queue.
Let’s revisit the two desiredSize properties mentioned earlier:
ReadableStreamDefaultController.desiredSizeWritableStreamDefaultWriter.desiredSize
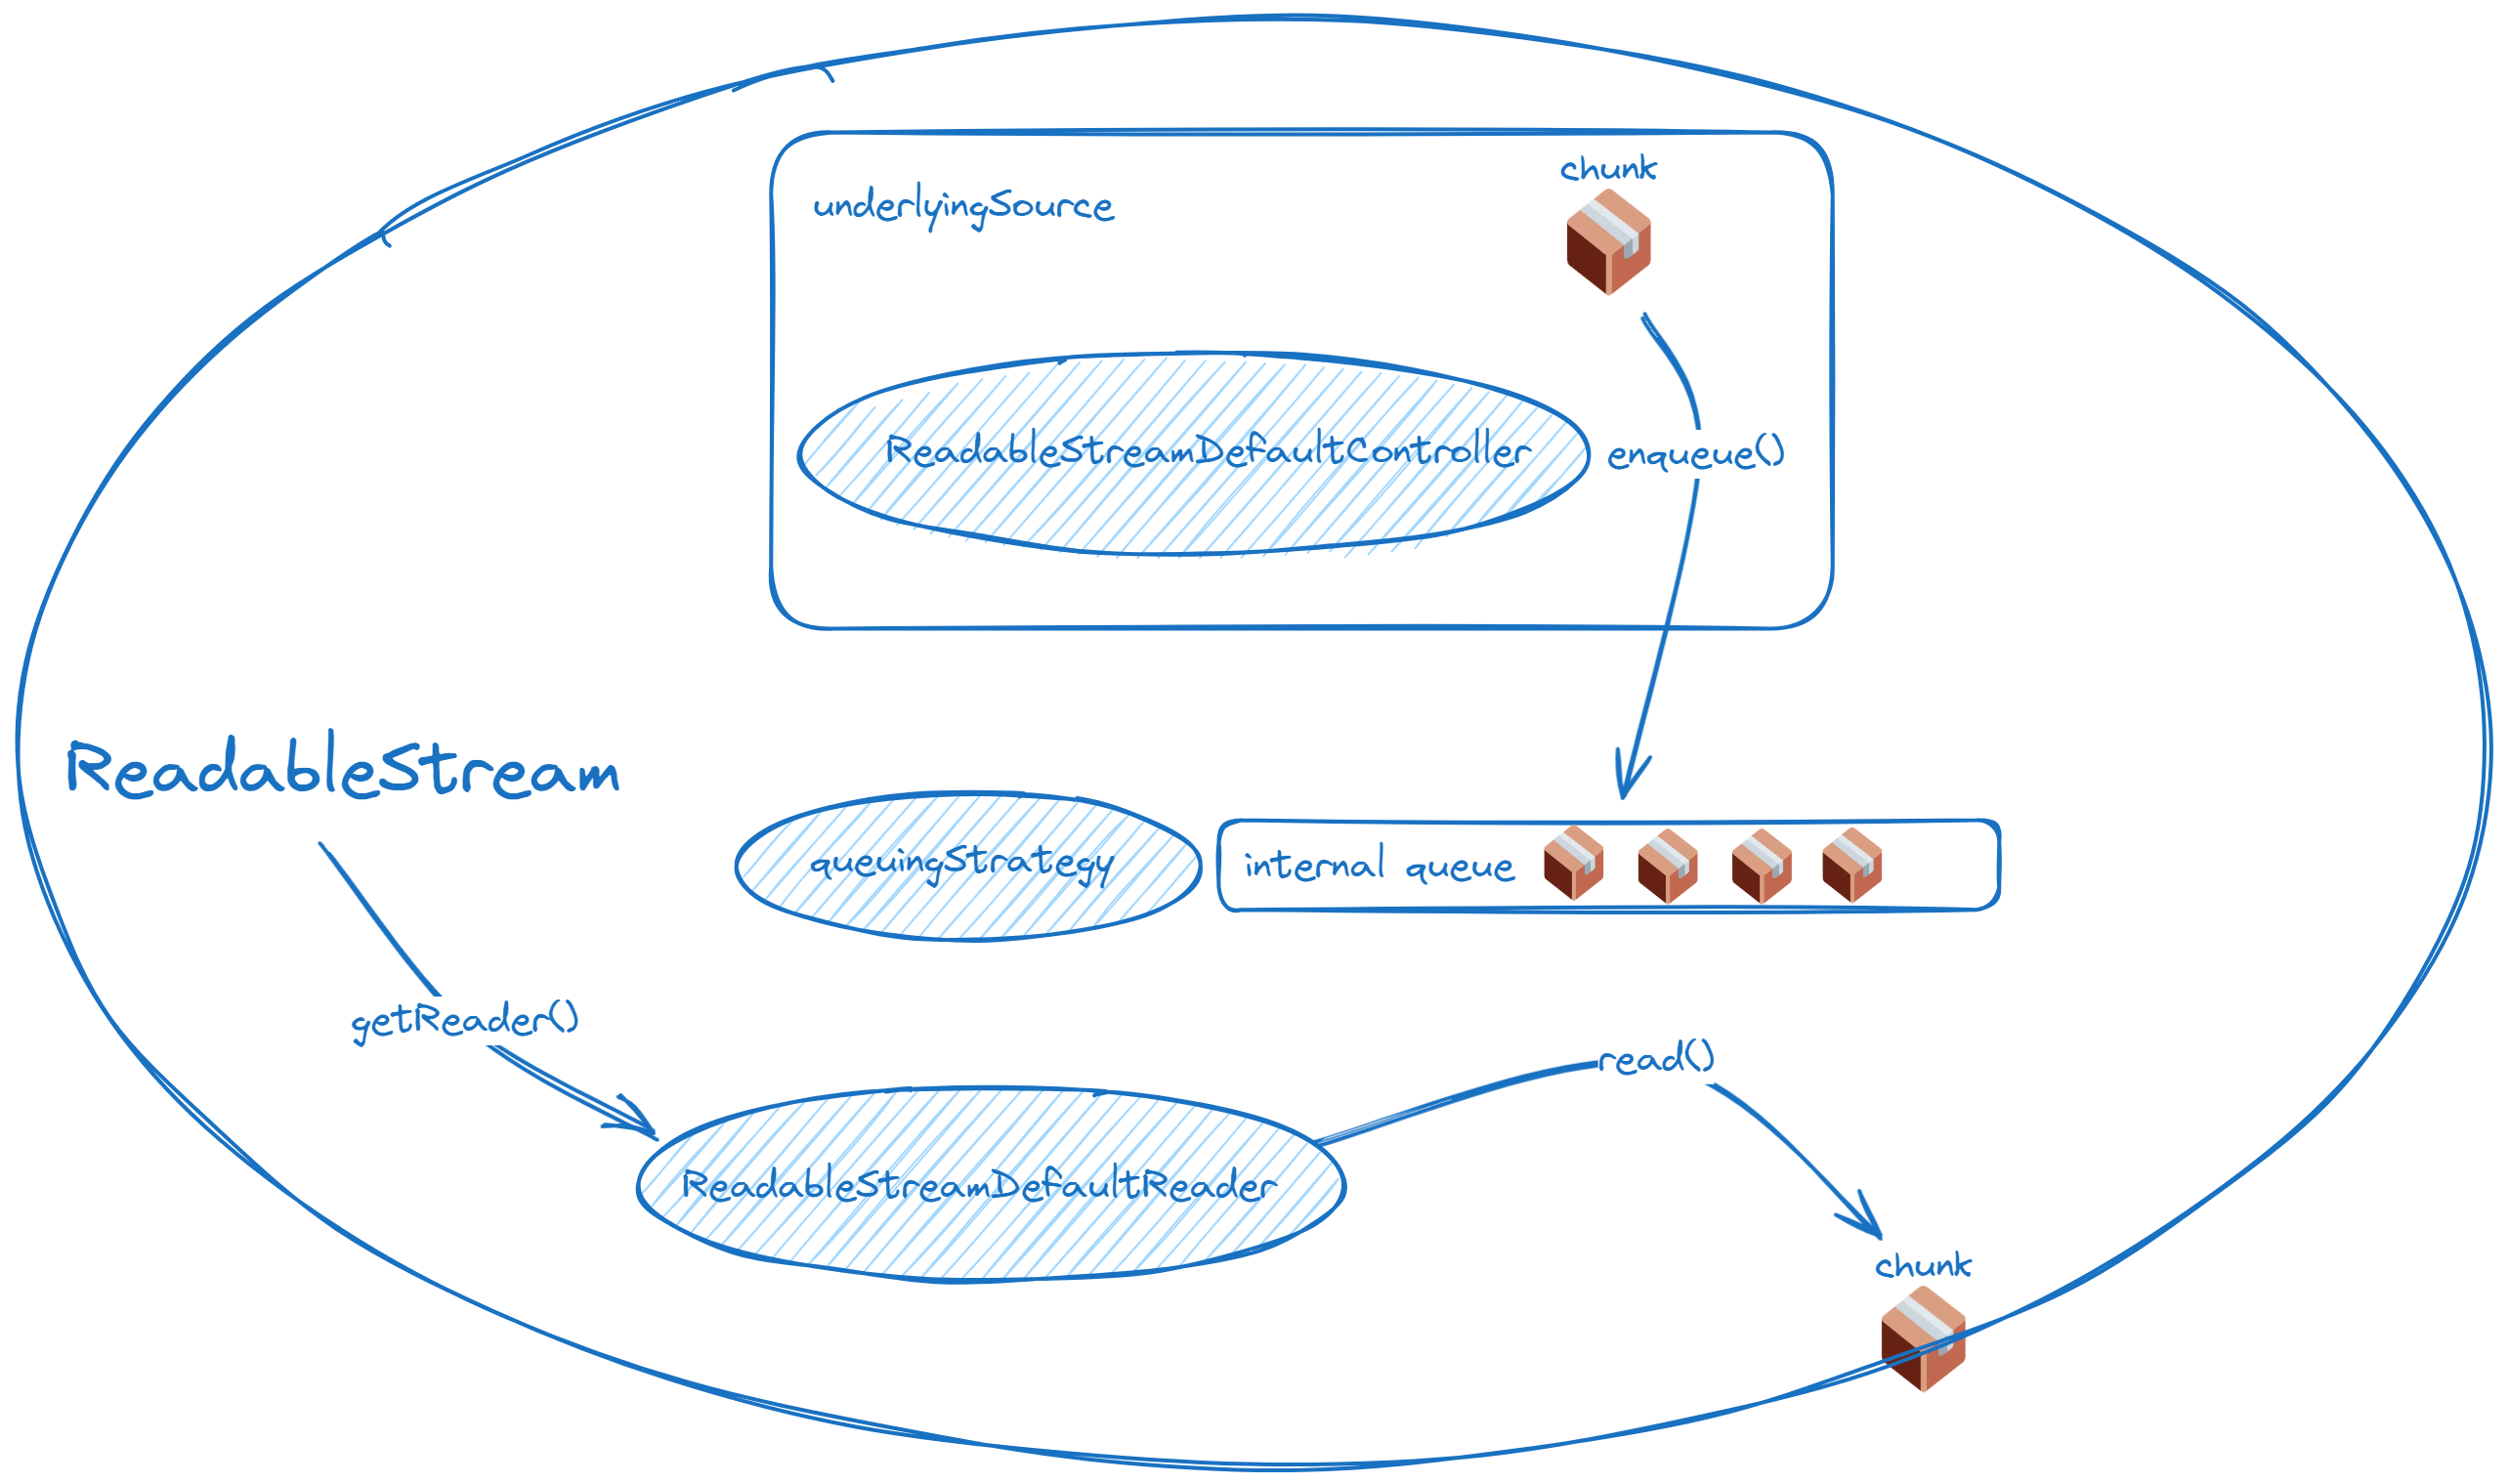
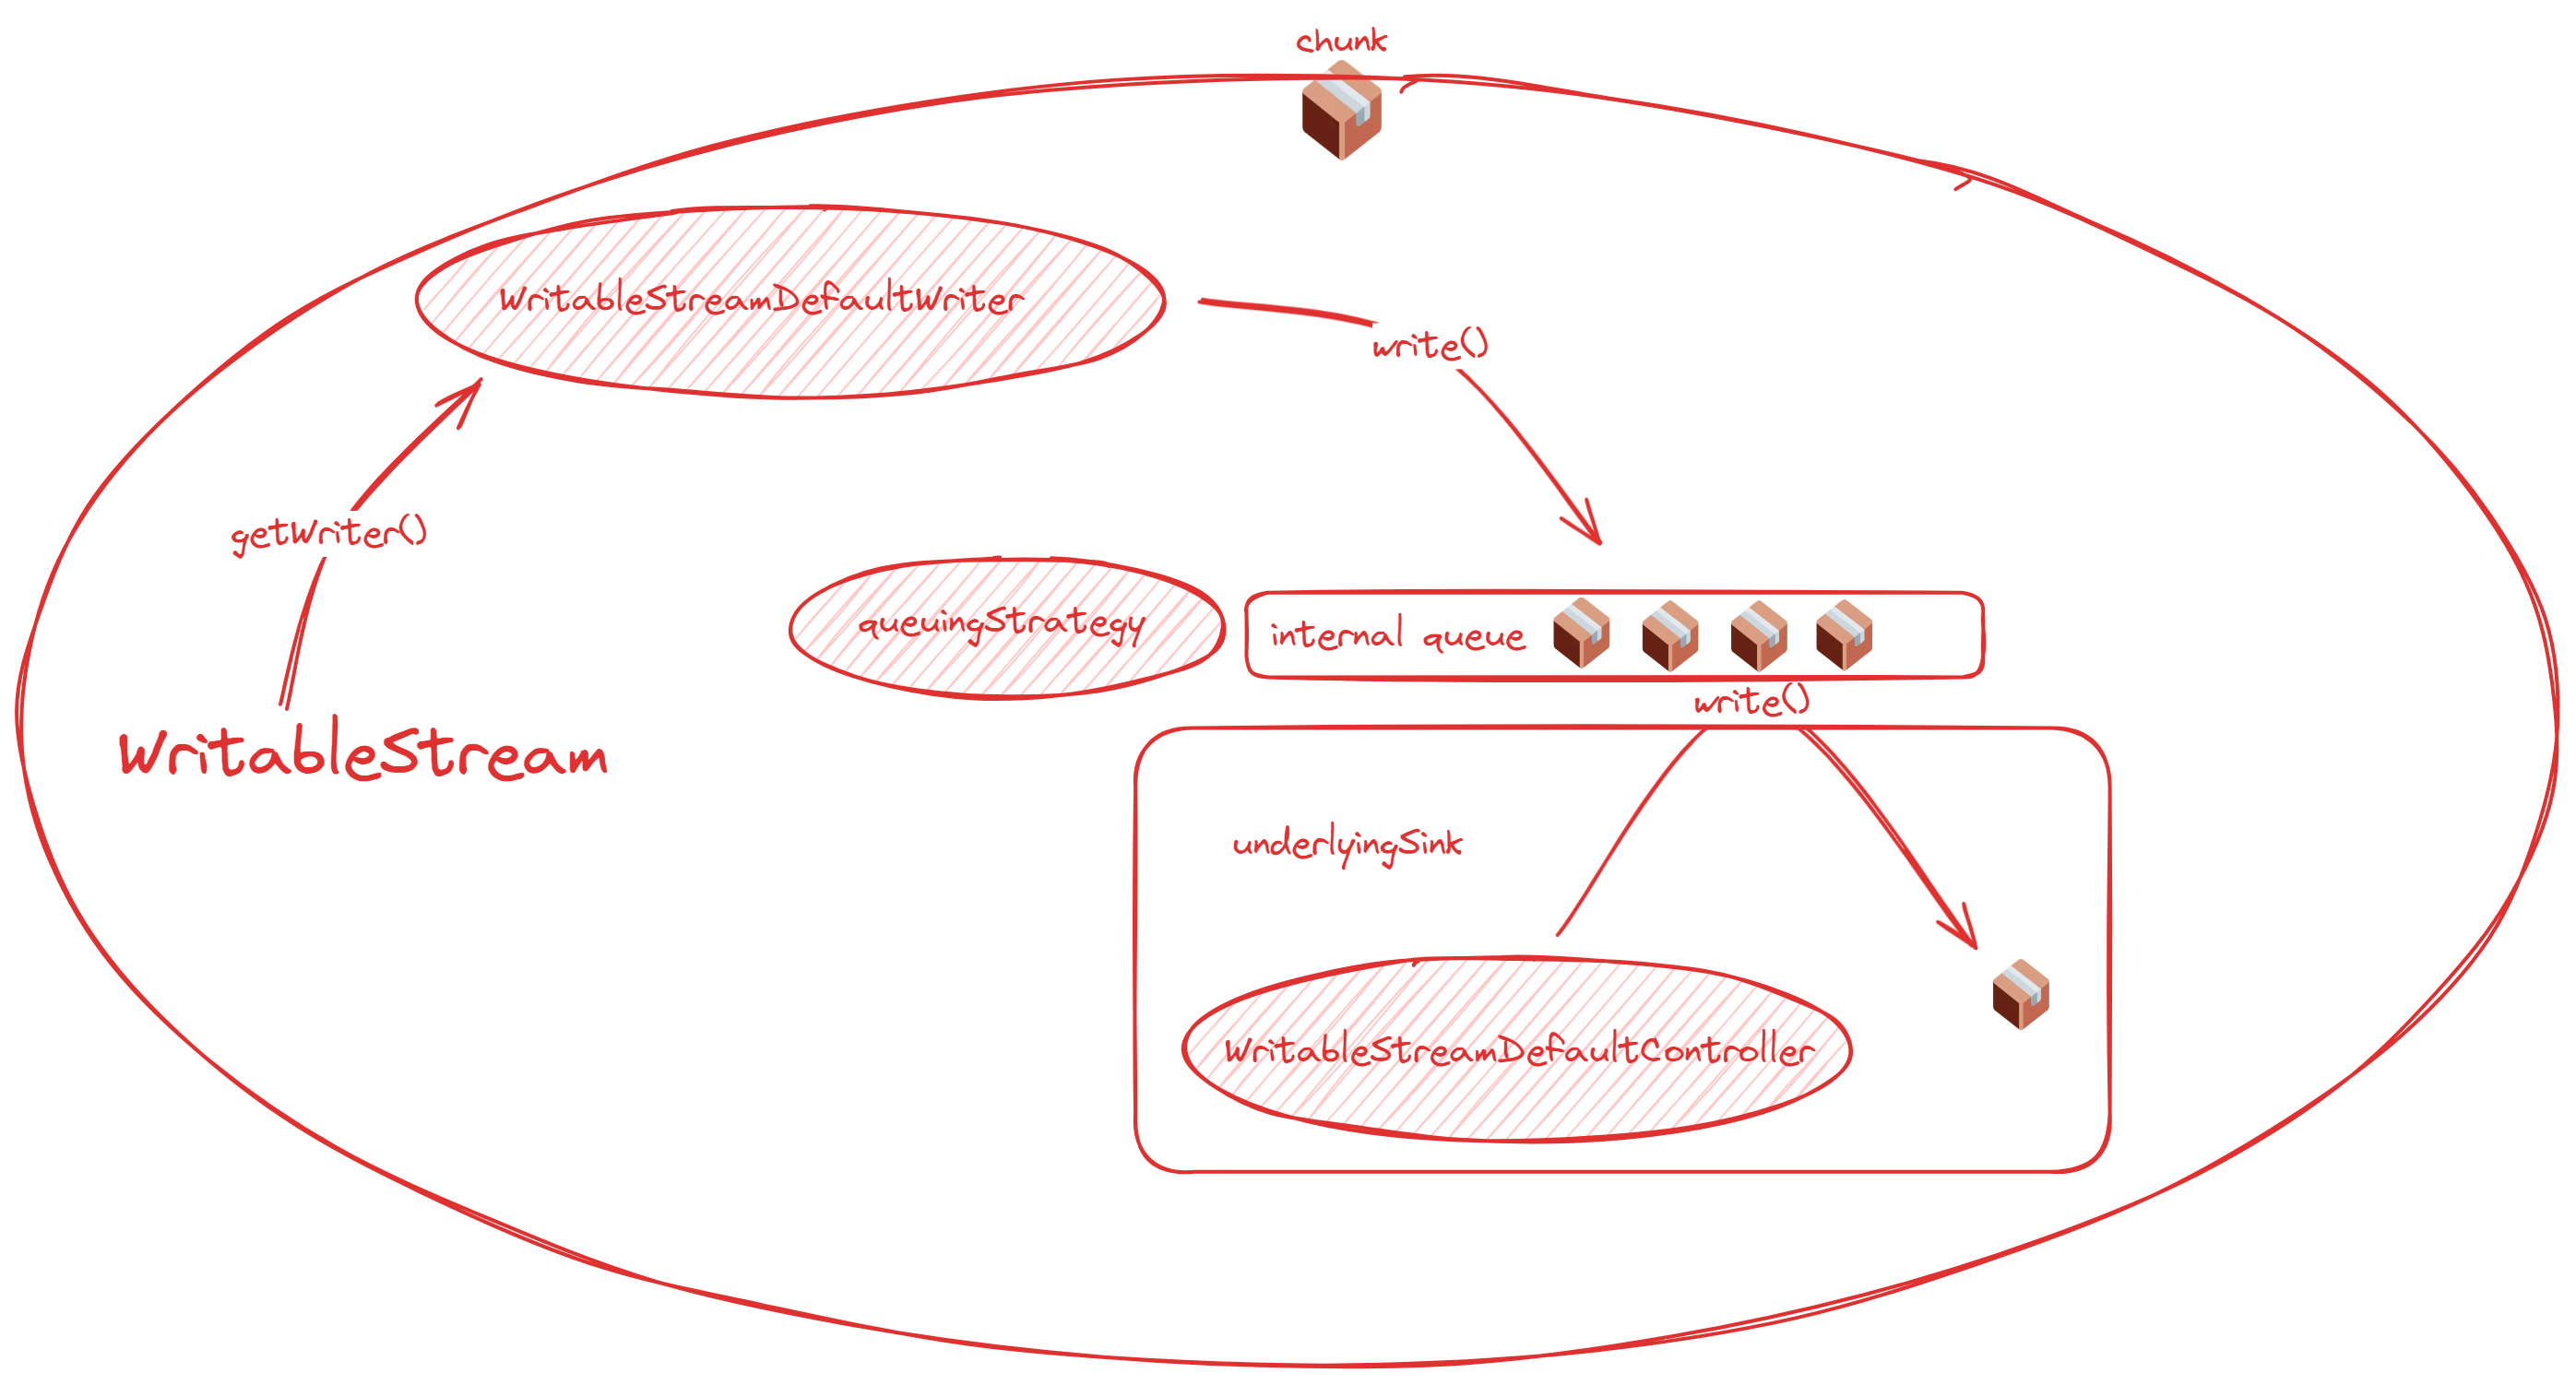
One is found in the readable controller, while the other is in the writable writer. You might wonder, why is one associated with the controller and the other with the writer? The diagrams below will make it clear!
These two diagrams summarize the relationship between readable and writable streams and their queues, clearly showing where the queues are located.
ReadableStream:
WritableStream:
For the readable side: When there is space in the internal queue, the pull method of the readable stream will be automatically called until it reaches the high water mark. If you define how data is generated in the start method, you should try to stop generating data when desiredSize is non-positive.
For the writable side: As a writable stream, you generally don’t directly concern yourself with the value of desiredSize. Remember WritableStreamDefaultWriter.ready? When ready is true, desiredSize is positive. Therefore, when implementing a writable stream, you typically await writer.ready, which allows you to properly manage the queue.
In simple terms, just remember that the underlying source and the underlying sink are always at the two ends of the entire stream, with the queue positioned in between.
4.1 Queue Accumulation Demo
You can visualize the concepts mentioned above by checking out the Demo.
const rQueuingStrategy = new CountQueuingStrategy({ highWaterMark: 15 })const readableStream = new ReadableStream( { start(controller) { button.onclick = () => { const log = index++ + ' start: ' + randomChars() + controller.desiredSize logInDiv(readableDiv!, log) controller.enqueue(log) console.log('controller.desiredSize', controller.desiredSize) } }, pull(controller) { const log = index++ + ' pull: ' + randomChars() + controller.desiredSize logInDiv(readableDiv!, log) controller.enqueue(log) console.log('controller.desiredSize', controller.desiredSize) }, }, rQueuingStrategy,)This readableStream doesn’t generate any data at the start; it merely registers a button click callback. When the button is clicked, it will enqueue a piece of data. The pull function is automatically invoked whenever there is available space in the internal queue. As long as there is space in the queue, data will be continuously enqueued.
const wQueuingStrategy = new CountQueuingStrategy({ highWaterMark: 10 })const writableStream = new WritableStream( { async write(chunk) { await sleep(5000) logInDiv(writableDiv!, chunk) }, }, wQueuingStrategy,)In the writableStream, we simulate a very slow consumption speed (one item every 5 seconds). This will inevitably cause the queue to accumulate, making it easy to observe the queue’s operation.
Finally, write a bridge function to link the input and output streams:
const bridge = async function () { const reader = readableStream.getReader() const writer = writableStream.getWriter() while (true) { const { value, done } = await reader.read() if (value) { console.log('writer.desiredSize', writer.desiredSize) await writer.ready writer.write(value) // 中间列的输出 logInDiv(transformDiv!, value) } if (done) { break } }}When the code runs, it takes 5 seconds for the underlying slot to process data for the first time. The underlying source’s pull keeps generating data, causing the queue to fill up quickly, resulting in the following effect 👇

By looking at both sides, you can determine how much the writable stream has written and how much the readable stream has read. The difference between the two sides’ counts represents the queue’s capacity.
In the console, you’ll notice that desiredSize remains at 0. However, clicking the enqueue button still allows you to add data, which simply continues to queue up. This means highWaterMark is merely a guideline and not a strict limit. Even if the queue exceeds the highWaterMark, you can still operate on the data. But remember, this is not without cost as it consumes memory. Therefore, when designing streams, it’s crucial to be considerate and avoid producing more data when desiredSize is 0.
5. Practical Application
5.1 Transferring Encrypted Large Files
Scenario: Transfer a large encrypted txt file from the backend to the frontend. The frontend will decrypt and display the file. Compare the speed difference between using streaming and waiting to receive the entire file before processing.
app.get("/novel", async (req, res) => { // get file const file = fs.createReadStream("les-miserable.txt", { highWaterMark: 1024 * 25 }); // set header res.set("Content-Type", "message"); const encryptStream = new Transform({ transform(chunk, encoding, callback) { setTimeout(() => { const encrypted = []; chunk.forEach((byte) => { encrypted.push(map[byte]); }); const encryptedBuffer = Buffer.from(encrypted); this.push(encryptedBuffer); callback(); }, 10); }, }); file.pipe(encryptStream).pipe(res);});Let’s begin with the backend service. This interface reads a 3.21 MB file of “Les Misérables”, encrypts it, and returns it to the frontend.
The encryption process is quite simple. It involves creating a Map that randomly shuffles values from 0 to 255, mapping each byte to an encrypted value. For a more robust encryption system, a real encryption algorithm should be used, and additional measures such as using WebAssembly (wasm) and regularly updating the keys can be considered.
At this point, if you open the browser’s developer tools, you’ll see that the request content is a bunch of garbled text because the mapped content cannot be decoded by UTF-8 at all.
The frontend handles this interface in two ways: the first is to decrypt after streaming processing, and the second is to wait for all the data to arrive and then process it all at once.
The streaming processing code is as follows:
class Decrypter extends TransformStream {  constructor() {    super({      transform(chunk, controller) {        const decrypted = chunk.map((byte) => decryptMap[byte]);        controller.enqueue(decrypted);      },    });  }}class DomWriter extends WritableStream {  constructor() {    super({      write(chunk) {        resultsContainer.append(chunk);      },    });  }}
let ac = null;const getNovelStream = async () => {  if (ac) {    ac.abort("refetch");  }  resultsContainer.innerHTML = "";  const start = performance.now();  // prevent wrong callback  ac = new AbortController();  const signal = ac.signal;  // signal = null  const response = await fetch(`/novel`, { signal });
  let firstResponse = performance.now();  console.log(`Done! 🔥 Took ${firstResponse - start}ms`);
  await response.body    .pipeThrough(new Decrypter())    .pipeThrough(new TextDecoderStream())    .pipeTo(new DomWriter());  console.log(`Streaming done! 🔥 ${performance.now() - firstResponse}ms after request.`);  ac = null;};
Here are four simple stream classes involved:
- A readable stream for fetch results
Decrypter: Decrypts using an inverse map of encryptionTextDecoderStream: Encodes the byte array from fetch results into a stringDomWriter: A writable stream that writes data into the DOM
The traditional method of waiting for all data seems simpler:
const getNovel = async () => {  if (ac) {    ac.abort("fetch all");  }  resultsContainer.innerHTML = "";
  let firstResponse = performance.now();  const response = await fetch(`/novel`);  const arrayBuffer = await response.arrayBuffer();  const view = new Uint8Array(arrayBuffer);  for (let i = 0; i < view.byteLength; i++) {    view[i] = decryptMap[view[i]];  }  const decoder = new TextDecoder();  resultsContainer.innerHTML = decoder.decode(view);  console.log(`Streaming done! 🔥 ${performance.now() - firstResponse}ms after request.`);};
Testing reveals a significant difference in user experience between these two processing methods. Stream processing allows content to be displayed immediately, whereas the traditional method requires a two-second wait before content is visible.
5.2 Log Output
If you need to transmit ten thousand lines of logs, waiting for all the data to arrive is impractical, and rendering all the data at once can lead to performance issues. Hence, using streaming is a suitable solution in this scenario.
class LineSplitStream extends TransformStream { constructor() { let leftover = ""; super({ transform(chunk, controller) { console.log(chunk); leftover += chunk; const lines = leftover.split("\n"); leftover = lines.pop(); controller.enqueue(lines); }, flush(controller) { if (leftover) { controller.enqueue([leftover]); } }, }); }}When handling log output, it’s important to note that the stream obtained via fetch does not automatically split based on newline characters. Therefore, we need to implement our own logic to determine what constitutes a “line.” This serves as a good example of a “stream without boundaries.”
By examining the console output chunk, we can confirm that the data boundaries are not defined by \n. Thus, implementing LineSplitStream is necessary to correctly handle data grouping. If you plan to build other protocols on top of HTTP, this step is crucial, as data chunks need clear boundaries to be processed accurately.